
Your brand has a blog. But is the blog a place to put ideas that your customers might find interesting or just ones that won’t fit in a social media post or infographic? If you’re thinking strategically, your blog can be much more than that.
One of the best ways to impose discipline, structure and purpose on your blog is to focus on format. This means choosing types of articles and following guidelines to keep consistent within each blog post format.
At first, this may sound less fun or creative than casual blogging typically is, but it’s a great way to make the blog more useful to your brand. With a consistent format, you can target your audience more effectively and express messages more clearly when they’re planned out as part of an intentional content marketing strategy.
4 Blog Format Styles to Try
Wondering where to start with your blogging career? Never fear, there are a few reliable blog format standbys your audience will be thrilled to read. You can even follow a blog post template to make sure these posts aren’t missing any high-priority elements.
Here are 4 of these reliable blog post warhorses:
1. Pillar Post
A pillar post is a foundation to build the rest of your content marketing strategy. It’s like the “Complete Guide” to your subject of choice. This is where you pour time, effort and search engine optimization research. A pillar post can contain many sections, with future blog posts expanding those ideas to feature-length.
With the extra space to spread out, pillar posts offer plenty of opportunities to add Google-friendly keywords and focus on getting your search ranking up. Use an SEO tool like Marketmuse to stay on the right track, and make sure you optimize for a keyword that truly resonates with your target audience.
2. List Post
A list post, or listicle, is a classic feature of a blog – it’s informative and easy to read and presents your brand as an expert without being long enough that it could scare off your audience or discourage them from reading it. From trends to best practices and beyond, there’s a list post for every season.
Depending on what you’re listing, you may find it best to mention a few items and go into detail about them or to deliver an impressively long list of one-sentence bullet points. Either approach has its appeal. The long-text approach is good if you want readers to learn more from the list itself. Brevity is a good way to serve up dozens of links to other pages.
3. Roundup Post
A roundup is a special kind of list post. It typically runs at the end of a year (or another significant time for your business) and gives readers insights as to what they missed. It can round up news stories, big events, or other posts on your blog. This gives new life to past content.
Do you want to celebrate your most successful content or point readers to your top products? Or would you rather offer your audience a second chance to discover items they may have missed out on? Roundups can take either form. As with a standard list post, you get to decide whether each entry receives a lengthy text accompaniment or a short bullet point.
4. Step-by-Step Guide Post
Do you want to become a trusted authority for your audience? If so, guide them step-by-step to a goal they’re struggling to accomplish. This type of post isn’t the place for sales-y promotion or tooting your own horn. Just be useful, and watch your brand grow.

Of course, if the process you’re describing involves one of your products or services, there will be an unavoidable branded tinge to your guide blog post. This is a worthwhile use of an article, provided you remember that the goal is to make something work better, not give a hard sell.
Subscribe to
The Content Marketer
Get weekly insights, advice and opinions about all things digital marketing.
Thank you for subscribing to The Content Marketer!
How to Format a Blog Post in 8 Easy Steps
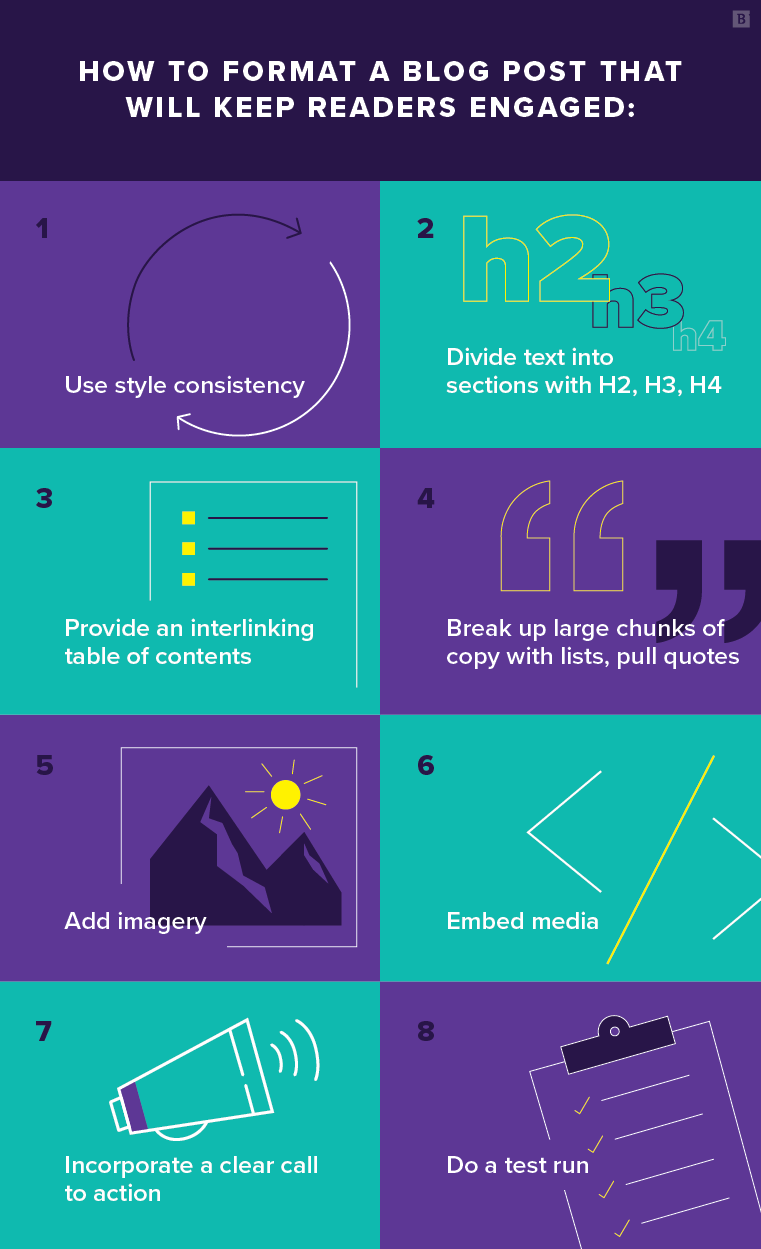
- Use Style Consistency
- Divide Text Into Sections With H2, H3, H4 (Plus WP Migration Tips)
- Provide an Interlinking Table of Contents
- Break Up Large Chunks of Copy With Lists, Pull Quotes
- Add Imagery
- Embed media
- Incorporate a Clear Call to Action
- Do a Test Run
1. Use a Style Guide
Consistent branding is part of how your blog posts deliver a consistent experience for visitors.
If you’re creating and managing a blog, you need to have a brand style guide that will help you develop a consistent, tone, look and feel – especially if you have multiple people contributing to or managing the content.
Visually, you need to answer questions such as:
- What font will you use?
- What font size will you use?
- What type of spacing will you use?
- Will you justify your text (please don’t) or flush it left?
- What kind of headers will you use (more on that later)?
Within the copy, style elements to consider include:
- Do you capitalize the first letter of each word in your headline?
- Do you put punctuation at the end of each item on a bulleted list? Like so.
- How will you address dashes used to break up sentences – with the en-dash (–) the em-dash (—) or the hyphen (-)?
Are we picking at nits? Possibly – but who’s to say your audience won’t, especially if you’re writing to educated, well-read prospects? Could you imagine how much credibility you would lose if, in one sentence you used the Oxford comma, and then in the next, you didn’t?
Use a consistent style in your visual and verbal branding. And while you’re at it, make sure you edit and proofread everything you publish, whether it’s a blog or not.
2. Divide Text Into Sections With H2, H3, H4 (Plus WP Migration Tips)
Dividing your text into clearly labeled sections helps make your content more scannable, and ultimately much more useful to your target audience.
It can also simplify the process of blog writing by helping you create a rough skeleton for how you intend to organize the content.
If you’re writing in Google Docs, incorporating these headers is fairly straightforward:
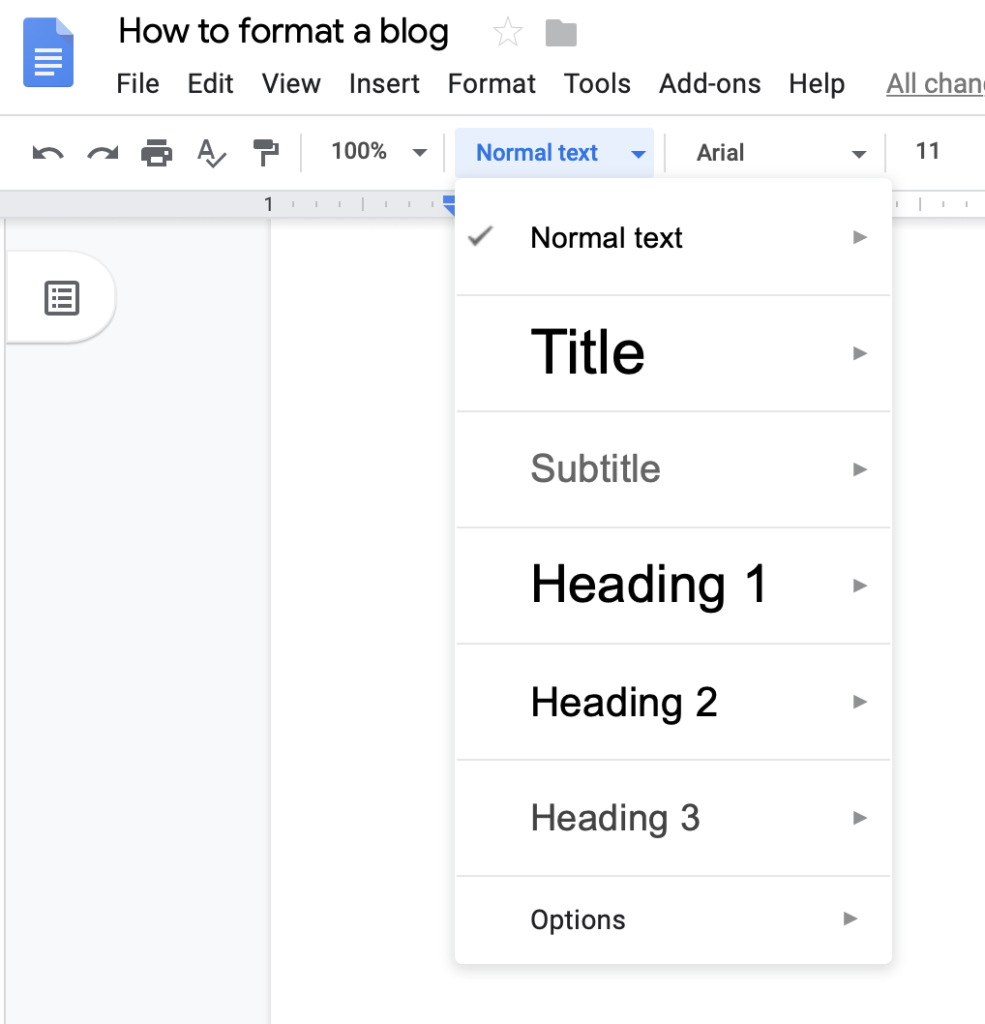
In your copy, you can nest H2 headers under H1 headers, nest H4 headers under H3 headers, etc. At Brafton, we use H2 headers for the main headers throughout the post and then H3 and H4 for sub-sections within those. The specifics are really up to you (just be consistent).
Simple enough, right? On the page, you’ll end up with something like this:
But there’s a catch, of course. Migrating content from Google Docs to WordPress often results in formatting changes or inconsistencies. Spaces are added, H2, H3 and H4 headers might be unformatted, typefaces can get left behind, images might not display correctly, etc.
There is no perfect solution that we know of to migrate content from Google Docs to WordPress, but here are the best solutions:
Move to the Gutenberg Block Editor
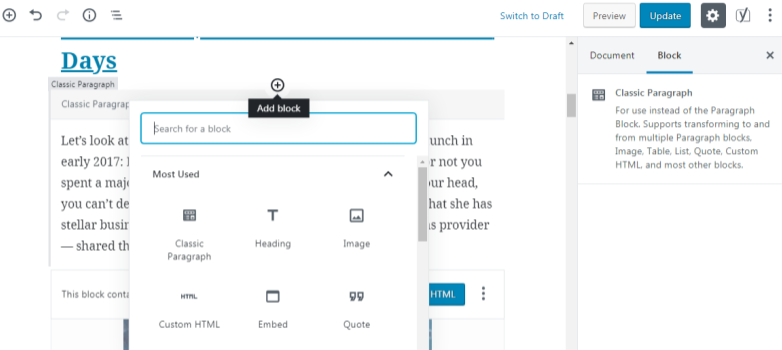
The Gutenberg Block Editor is available as part of WordPress 5.0 and later, and will replace the Classic Editor in 2021. It’s supposedly designed to fix the formatting issues introduced from a copy-paste into WordPress.
Instead of having one large text block that you can format as you please, you add “blocks,” each pre-formatted to display a certain type of content. For example, there’s a header block (which you can assign as an H2, H3 or another size. There are also blocks classic paragraphs, images, custom HTML and more.
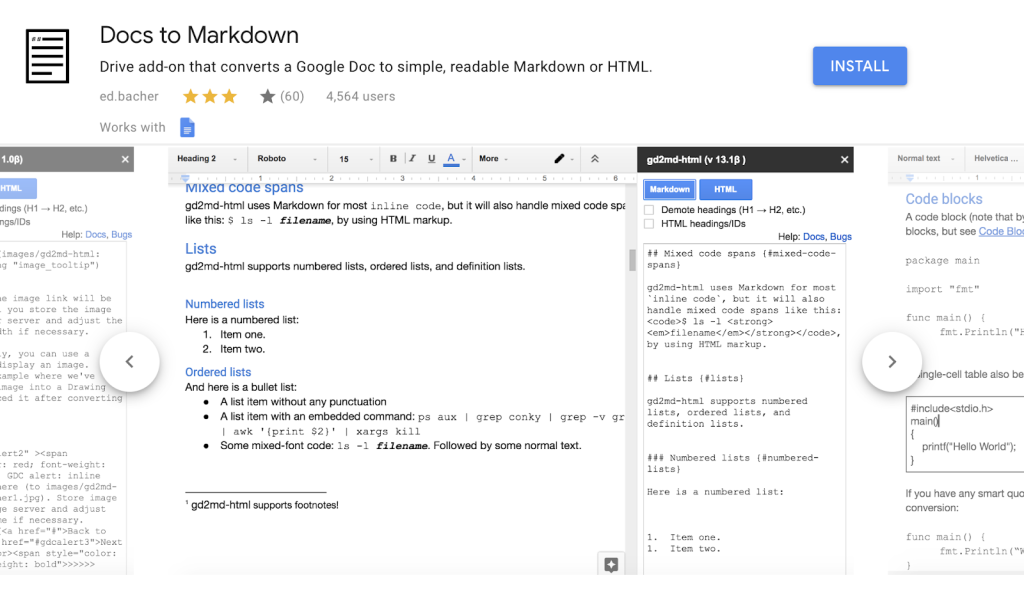
Use the Docs to Markdown add-on
This Google Docs add-on converts the text in the document to HTML, which can then be copied and pasted directly into the WordPress text editor. The classic paragraph block in the Gutenberg editor has the option to view the source code. This is where you can paste your HTML.
This helps maintain blog formatting, including lists and hyperlinks, and eliminate any extraneous code additions (such as extra spacing). The only caveat is that images and embedded media will have to be added manually.
Other options exist – such as the Mammoth .docx converter plugin – but almost all of them have some sort of flaw or imperfection, some of which are more annoying than others.
We stick by our recommendations, but this might be one of those instances where a bit of trial and error is in order.
3. Provide an Interlinking Table of Contents
Especially for long-form content (like this blog post), a clickable, interlinking table of contents – like the one in this post – can save a lot of scanning to find the specific subset of information a reader is searching for.
Ideally, you want to include this table of contents as close to the top of your blog posts as possible. Try to work the table of contents into an introduction organically, rather than plopping it at the top of the post. This might require a bit of finessing, but you can take cues from this blog post.
Here’s another example (this one uses two columns!):
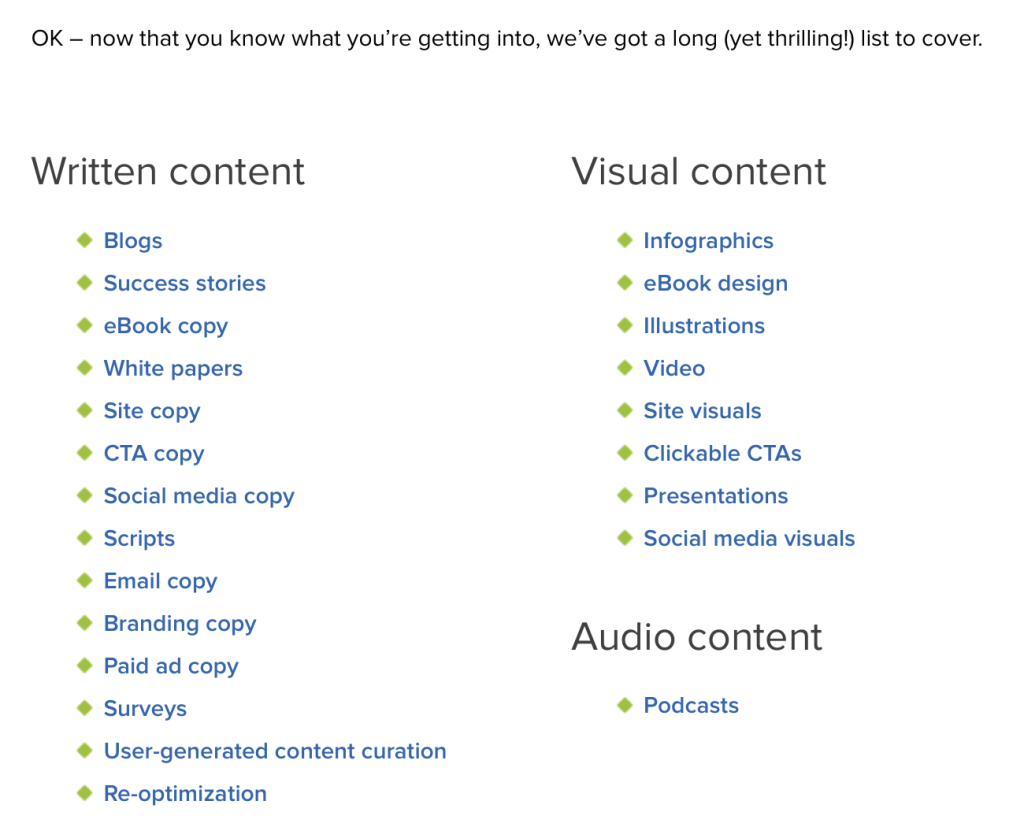
In this post, the writer has a short introduction that flows into an overview of what will be covered. Pretty straightforward.
As for how to create a table of contents that links to specific sections of your blog post?
Our preferred method is to place anchors next to your headers, then link to them from a list of those same headers at the top of your article.
Basically, place your cursor on the subhead that you would like to link to. Then click Insert > Anchor:

Next, name your anchor – keep it simple, so it’s not a pain to type in the anchor id later on.

Once you’ve done that, you’ll be able to see the id tag in the text version – notice that the end tag () comes immediately after the opening tag:

Next, go back up to the top of your article and enter an href attribute around that item in your table of content, like this:

Note: the hash symbol is an important part of the equation; this is what attaches the hyperlink to the element id in the page.
And voila. You can now click on the link in the table of contents to bring you to any part of the blog post.
4. Break Up Large Chunks of Copy With Lists, Pull Quotes
First and foremost, use short paragraphs where you can. Large blocks of text make readers feel claustrophobic and force them to wade through more copy to find the information they’re looking for.
Conversely, short, concise paragraphs can make a blog post feel airy and generally more readable.
Non-textual elements, meanwhile, can help break up otherwise dense copy and emphasize certain information. Consider a few examples:
- Bulleted lists.
- Pull quotes (or blockquotes).
- Imagery.
- Social media embeds.
Another way to emphasize certain messaging is with italics, underlining and bold text.
But a word to the wise: Use bold text sparingly. Same with italics and underlining. They blunt their impact when you overuse them.
Also, don’t do the underline, italics, bold and ALL CAPS THING.
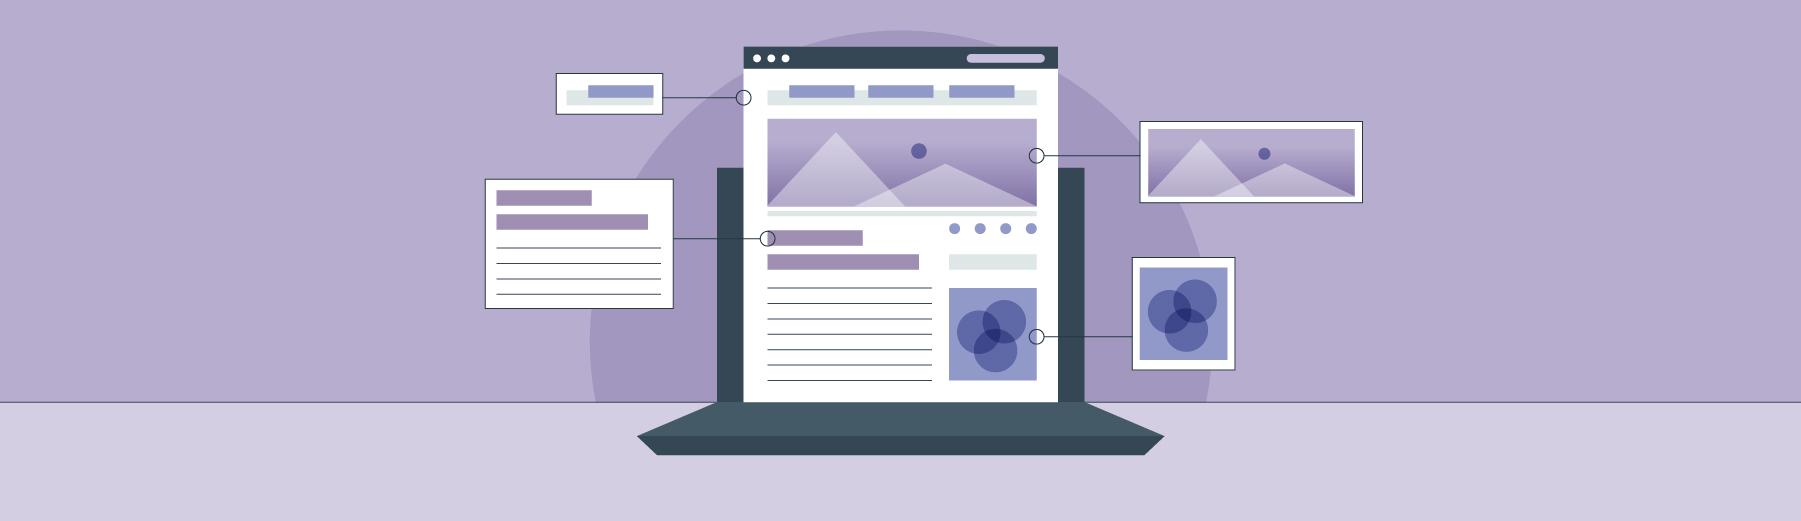
5. Add Imagery
They say that the brain processes images faster than text. They also say that visual information is retained longer.
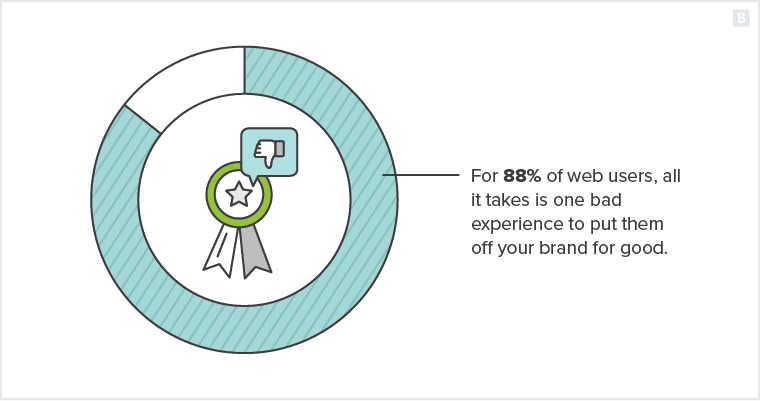
Some have even suggested that imagery has a positive effect on traffic, bringing in as much as 94% more page views.
Imagery also helps you rank in an image search (especially if you use alt text to contextualize the imagery for Google), as long as you avoid uploading pictures that are excessively large or unwieldy, as this can negatively affect page speed, and in turn, foil SEO.
But imagery’s greatest value is as another form of storytelling that conveys information in ways that are sometimes more engaging or entertaining than text.
For example GIFs and memes – the inside jokes of the web – can add personality. Charts can help simplify data.
Then there are GIFs of charts:
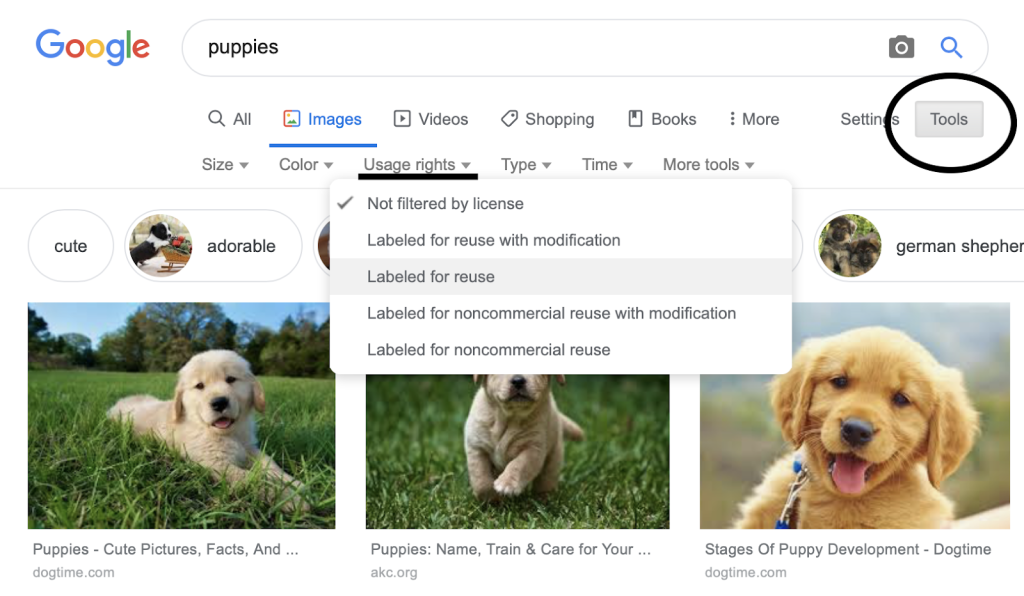
Screenshots, meanwhile can be instructive, especially for visual learners. For instance, here’s how you can find license-free imagery on a Google Image search:
As for stock imagery?
We’d recommend avoiding it where you can, and instead opting for custom illustrations, like the one at the very top of this blog post.
If you don’t have in-house graphic designers, free tools such as Canva can help you create your own graphics – though they make lack the style, nuance and craft that only a professional designer can provide.
And if you absolutely have to use stock imagery, here is a list of the sites that we recommend.
6. Embed Media
By media, we primarily mean audio, video and social posts. As with imagery, you shouldn’t necessarily embed them in your content just for the sake of having them.
For example, we embedded the video below as a complement to this post:
If your brand produces webinars or podcasts, be on the lookout for opportunities to plug that content where relevant. Remember, you want to keep leads and prospects on your site as long as possible – even if that means navigating away from your blog post to another page.
The best part? Embedding media is super easy. For popular video platforms such as YouTube and Vimeo, all you need is to include a link – plain old URL format – in the editor, and WordPress does the rest. Another option is to take the embed code straight from the video – in YouTube, you’ll find it when you click the “share” button and select the “embed” option. Insert the code into the text version of your post.
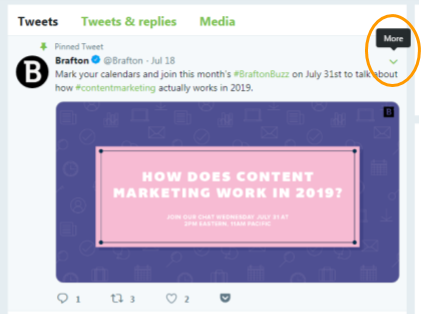
Same deal for social posts from Facebook, Twitter and Instagram. With Facebook and Twitter, just click on the timestamp of the post you want to embed, and then copy the URL for that page into the editor. Alternatively, you can find the embed code by clicking the small carrot in the upper righthand corner of your tweet:
If you prefer to customize of the post or video, however, you will need to copy and paste the embed code, and then tweak the dimensions.
And that’s really all there is to it.
7. Incorporate a Clear Call to Action
Content marketing is about so much more than making your website more visible to search engines with primary and secondary keywords, or generating site traffic.
It’s also about fostering brand engagements that will ultimately make it easier for you to sell to prospects.
Every blog post you write should therefore contain one or more action items that will prolong the reader’s engagement with your brand and ultimately build a relationship that will turn leads into prospects.
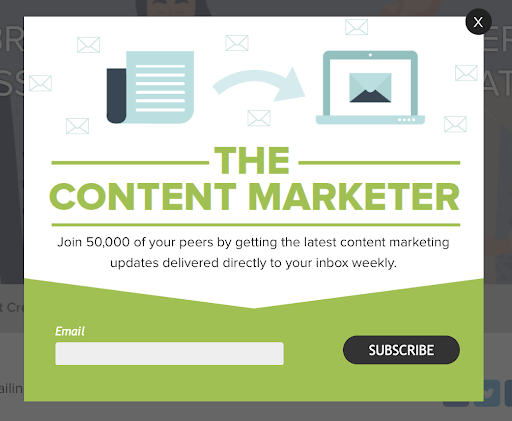
For instance, you can use tools like SleekNote and OptinMonster to create popup boxes that will encourage readers to sign up for your newsletter, like this one:
Keep in mind that a first-time visitor might not be sold on your brand at first, so make sure you include a subscribe button somewhere on your site that they can come back to:
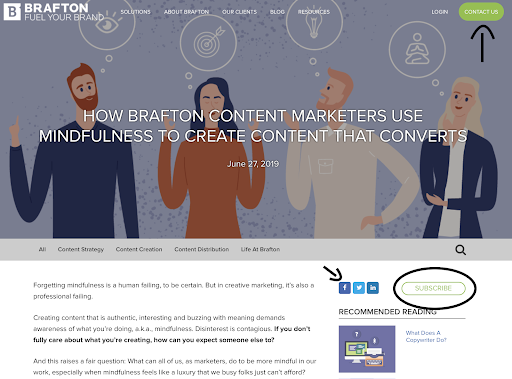
You’ll also notice that we’ve made it super easy for our audience to share our content on social media.
We also have a clear “Contact Us” button and several articles listed in the margin that might be of interest to readers.
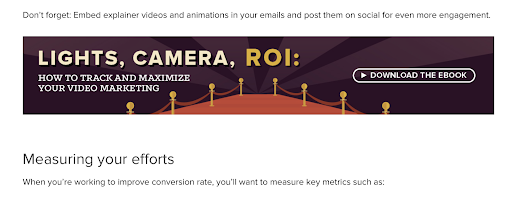
In addition to all of that, you can also embed clickable calls to action within your content that encourage readers to take some other action, such as downloading an eBook:
8. Do a Test Run
In other words, click the preview button in WordPress to see what your article will look like when it’s live. Here a few steps to take in preview mode:
- Scroll through your content and look for any extra paragraph breaks or other potential areas where formatting got wonky.
- Open links to make sure they’re working correctly.
- Ensure that video previews and images are displaying correctly.
- Click on your CTAs and fill in the form with your own contact information to make sure that’s working correctly.
- Click each item on your table of contents to ensure everything is linked correctly.
Once you’ve done all that, go right ahead and publish your content.
WordPress previews is pretty foolproof in terms of showing you exactly how everything will appear and function on the page, but it never hurts to do a quick scan of the live post.
If everything looks neat and tidy, then you’re good to go.
Pat yourself on the back, and move on to the next one.
Standardize Your Blog Format for Sustained Success
What types of posts will you focus on and in what amounts? How often will you create each post, and when in the week or month will you publish them? To keep readers coming back to your blog, these are a few of the questions you should answer early on.
Create A Blog Content Calendar
Working off of a blog content calendar is an important step in running a more organized blog. You can organize it by subject (e.g. one particular topic per week), by blog format (e.g. list articles every Friday) or both.
At first, a calendar may seem restrictive when compared to simply posting whenever, but that spontaneity is a fair trade-off for the benefits. After all, when there’s a calendar dictating when each post will go live, social media teams can pitch in with carefully-orchestrated support.
Find Your Blog Format Focus
When filling out your content calendar, you’ll have to choose: what are you going to focus on? Will you simply schedule every single blog format you can think of? It’s probably better to scale back and focus on a few types of content.
When readers know what to expect from your blog — and when they associate it with high-quality writing and a regular posting schedule — they’re more likely to return as readers. Your social media teams can engage with these repeat readers to connect even further, building a loyal audience.
Get Started On Your Blog
There’s more to talk about with blog format and posting strategies. But hopefully, this post will guide you as you make your blog the best it can be, rather than scare you off from posting. If your blog format efforts aren’t perfect, that’s fine. Adapting as you go, based on which articles are the most popular and engaging with your audience, is part of the blogging process.
Whether you’re breathing new life into an existing brand blog or starting fresh, a commitment to blog format can show your audience you’re serious about that venture. Then, once you’ve got their trust, it’s up to you to keep posting and hold their interest.
Editor’s Note: Updated November 2021